Data Preview of Nodes
The data preview is part of the operations/formula editor in a model, and gives you a first overview of a node’s data.
You as a user are able to check the displayed data before for example continuing to work on your model.
Furthermore, the data preview allows continuous cross-checks to validate the effects of functions and calculations.
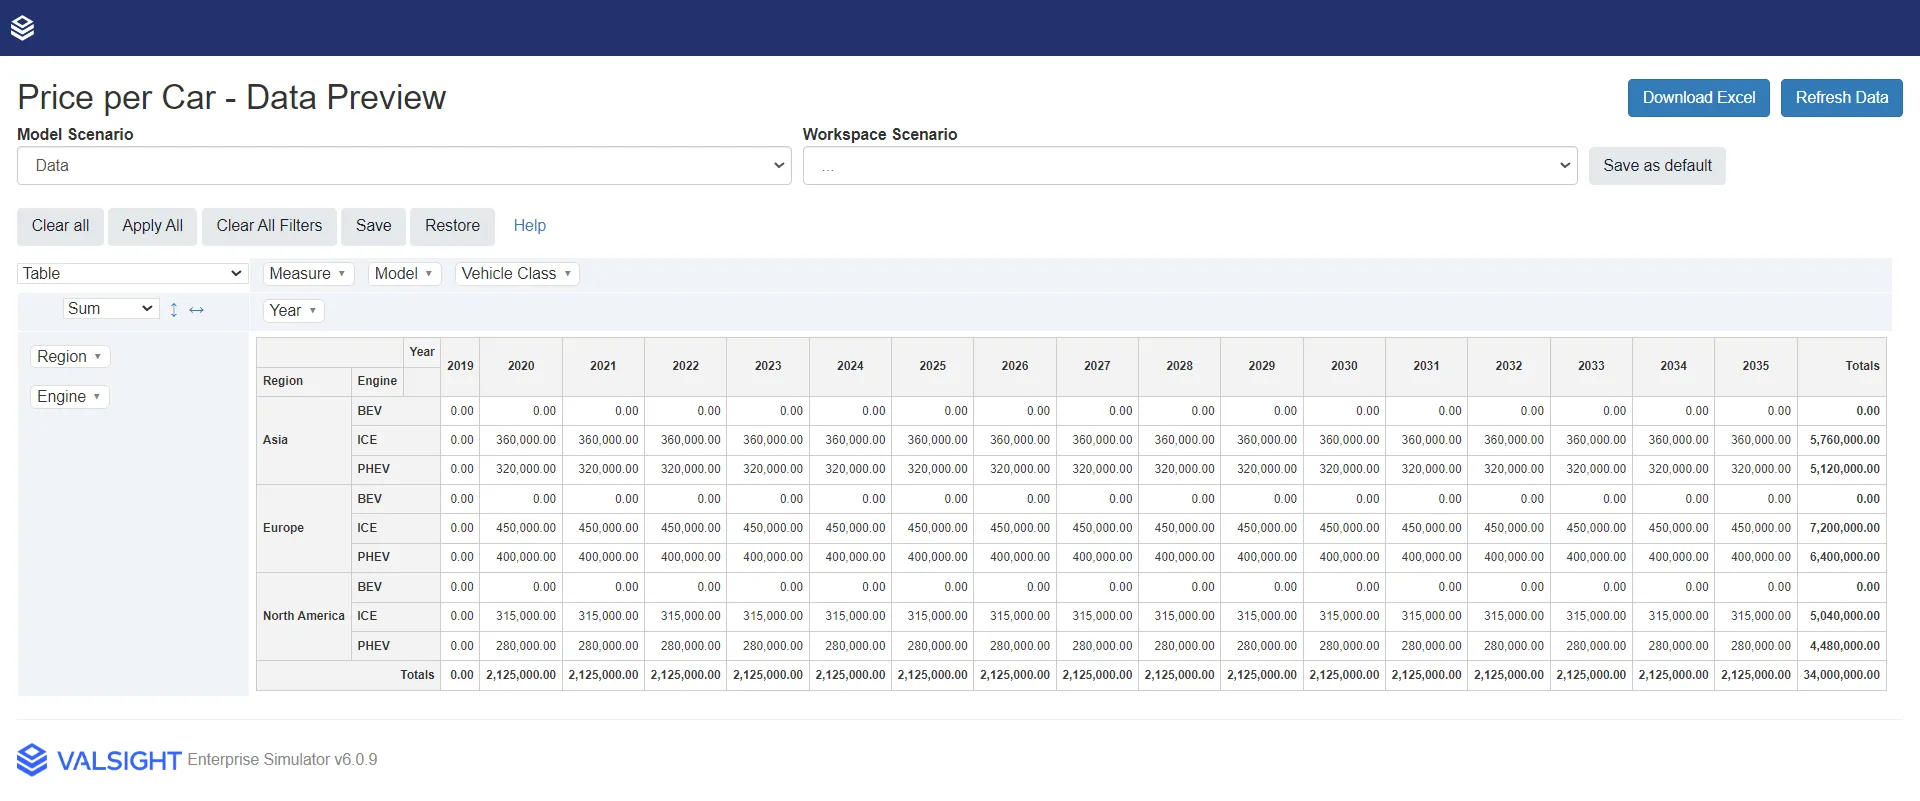
Functionalities
Default scenario
Setting a scenario as a default scenario enables a standardized view onto your data while switching between data previews of multiple nodes. It can be a baseline or a simulation run.
Use the two buttons next to the scenario selector:
- Save as default stores the current selection. It is disabled once that selection is already the default, with the tooltip “Already your default”.
- Clear default appears only when a default is saved. It resets the preview to the baseline the Model Editor passed in, and is disabled when that is already the state, with the tooltip “Already using model default”.
The default scenario is saved per user and per project, so each project can have its own.
Level filter
You can set individual filters for every available level in this table.
By opening the dropdown menu of a level on either of the axes, the user is able to filter out the available level values.
Buttons
The toolbar groups these buttons under Levels, Filters and View.
| Button | Group | What it does |
|---|---|---|
| Remove all | Levels | Takes every level off both axes, leaving an aggregated view of the data based on the selected aggregation type which can be set in the upper left corner of the table. Level filters are kept, so the total covers the still-filtered subset. |
| Add all | Levels | Puts every available level back on its axis (time in columns, all others in rows), for the most detailed data preview. Level filters are kept. |
| Clear | Filters | Removes all set level filters. This is the only button that touches filters. |
| Save | View | Saves all current data preview configurations (levels on axes, level filters,…). These configurations are not only saved for the data preview of this one Node, but for all Models of a Project. This enables you as a user to apply the same filters to multiple Nodes when for example doing drill-downs. |
| Restore | View | Restores the last saved data preview configurations and applies them in the selected data preview. This can not only be done in the same data preview, the configurations have been saved in, but in every data preview of the same Project with at least one equal level. In case of Nodes having only 2 overlapping levels, saved configurations only apply to those 2 overlapping levels. |
Additional instance setting for data preview
An instance administrator can set a cell limit for the data preview. In case a data preview exceeds this cell maximum, the data is automatically aggregated to a summed-up total.
That allows a cleaned-up and improved data overview.
The setting can be found under the Valsight settings > Settings under the heading ‘Calculations’. It is called featureFlags.DataPreviewShowsSumsByDefault, and the default maximum cell number is 100,000.
This is an instance-wide setting, not a per-project one: it is set once and applies to every project on the instance.
Example
To simplify the effect of each button, they will be explained based on an example.
For the following example, an imaginary automobile project is used. The time horizon is 2019-2030.
The model contains the following levels and level values:
Level | Level value |
|---|---|
Vehicle Class | SUV |
Sedan | |
Model | Fast SUV Y |
Grand SUV X | |
FamilyFirst Sedan 2 | |
Fancy Sedan 1 | |
Engine | BEV |
ICE | |
PHEV |
The context of the example is that the data preview shows the price per car, based on their vehicle class, their model, and their engine over the time horizon.
There is no increase in prices over that horizon.
Starting point
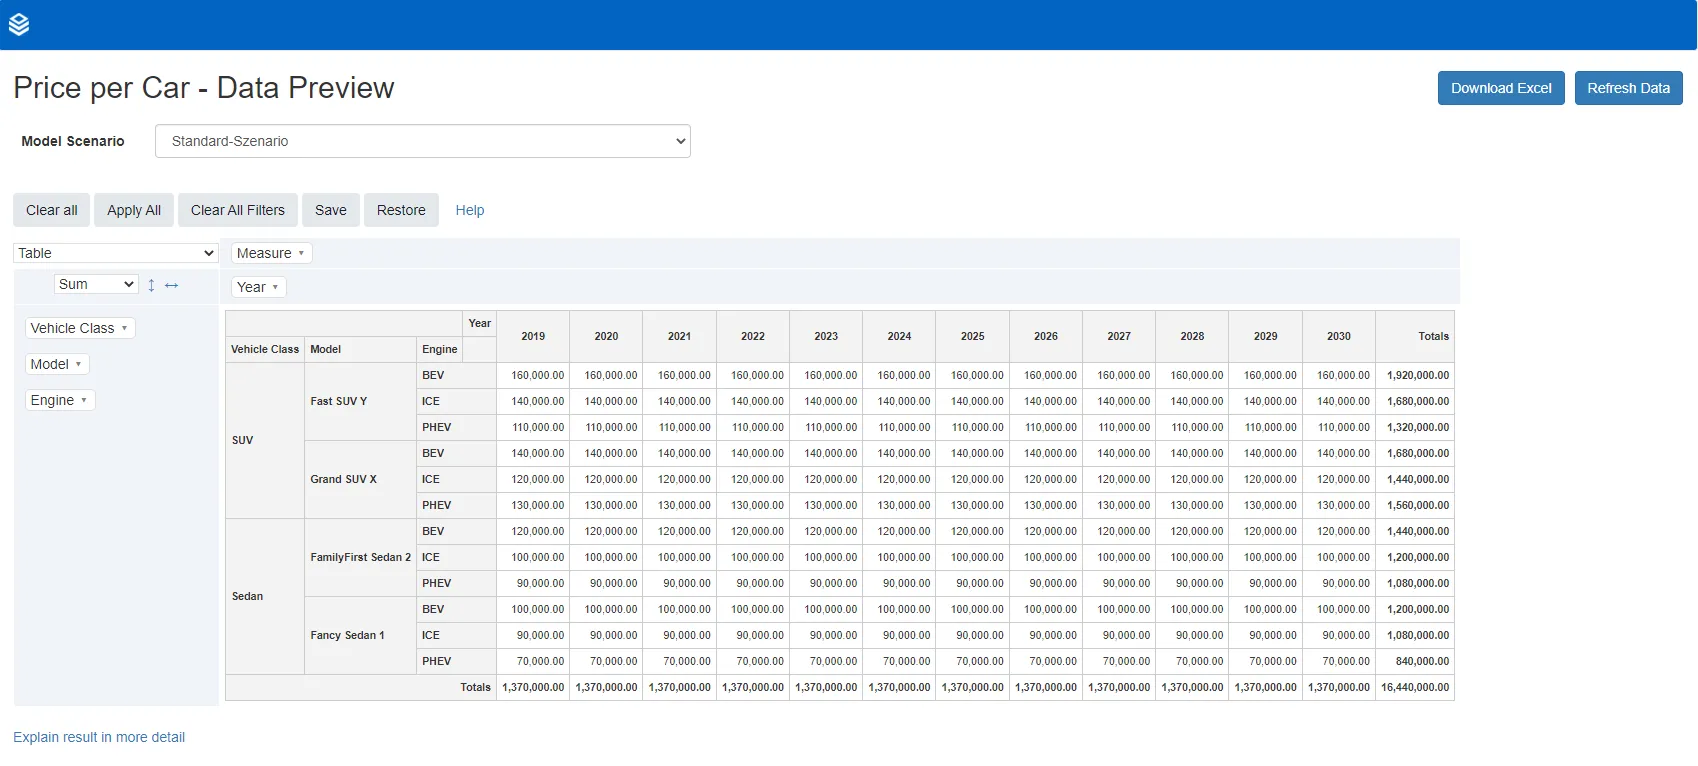
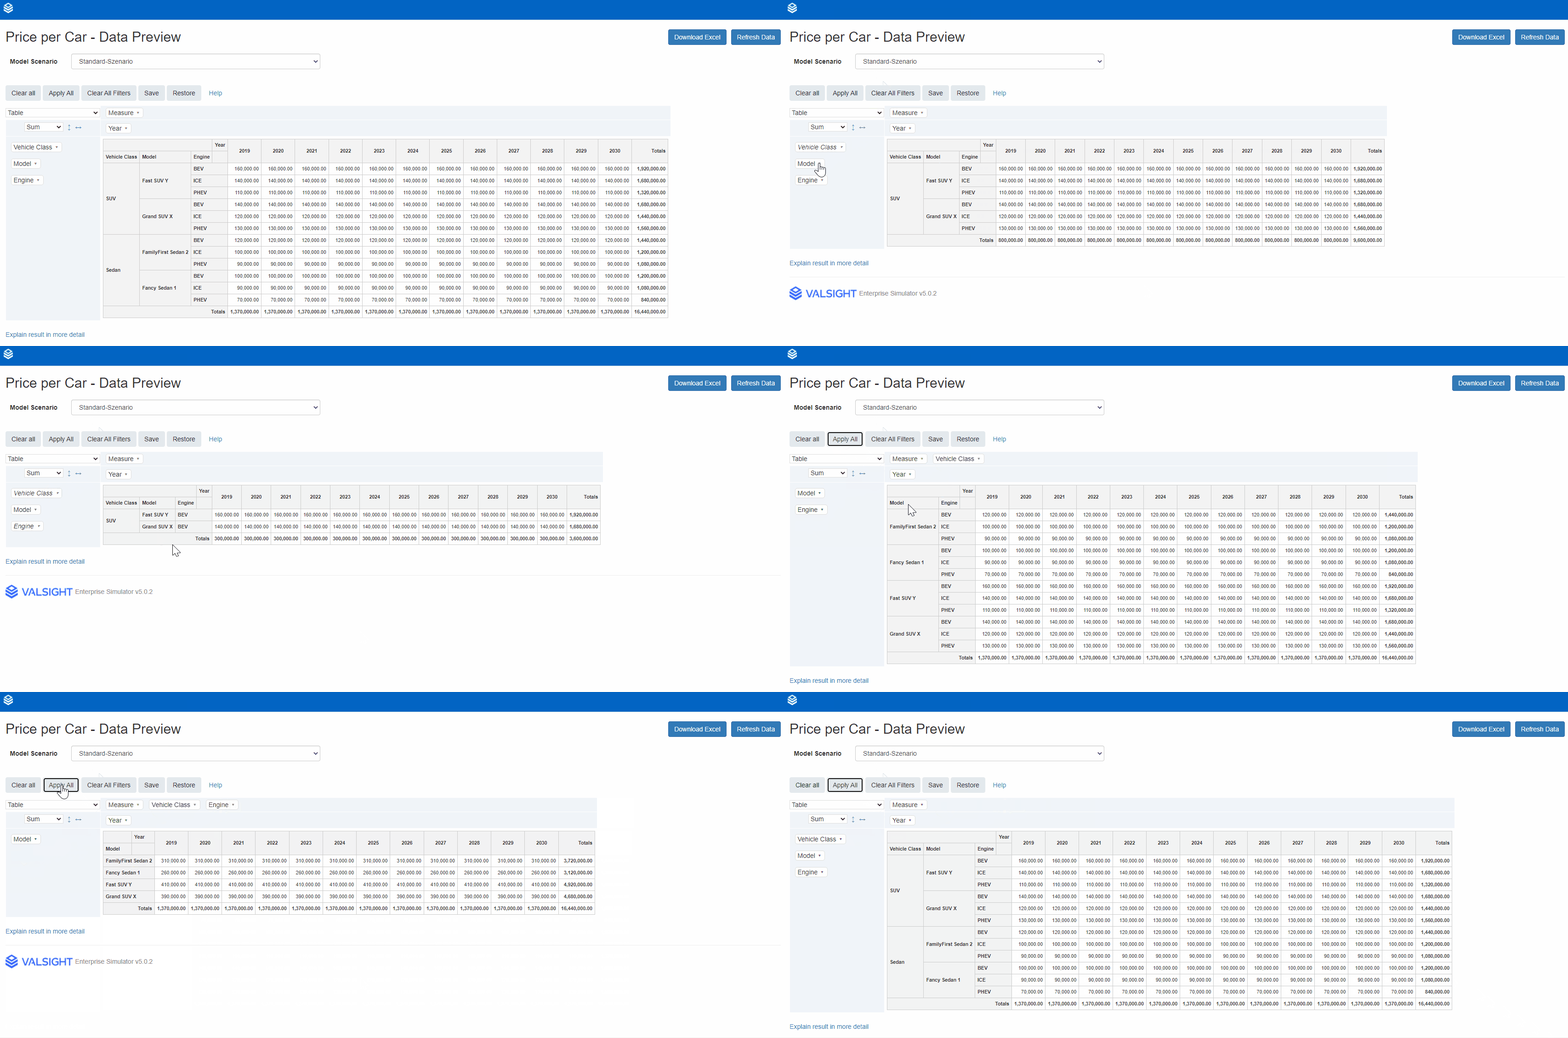
The starting point for the example is the initial data preview, without any filters or aggregations.
Remove all
The ‘Remove all’ function aggregates the data, to summed-up totals and reduces the data overview to a minimum amount of data for a better overview.
In this example, the data preview is aggregated to the total costs over the time horizon for both vehicle classes.
This function clears the axis configuration. Any level filters you have set stay in place, so the totals cover the filtered subset rather than the whole node.
Add all
The ‘Add all’ function applies all available levels to the according axes. Level filters are left alone.
In this example, levels have been reconfigured/shifted on the axes. Via the ‘Add all’ function these configurations are reset and the available levels are applied to their respective axes.
After using the ‘Remove all’ function, ‘Add all’ applies all available levels back to their axes. To clear filters as well, use ‘Clear’ in the Filters group.
Clear
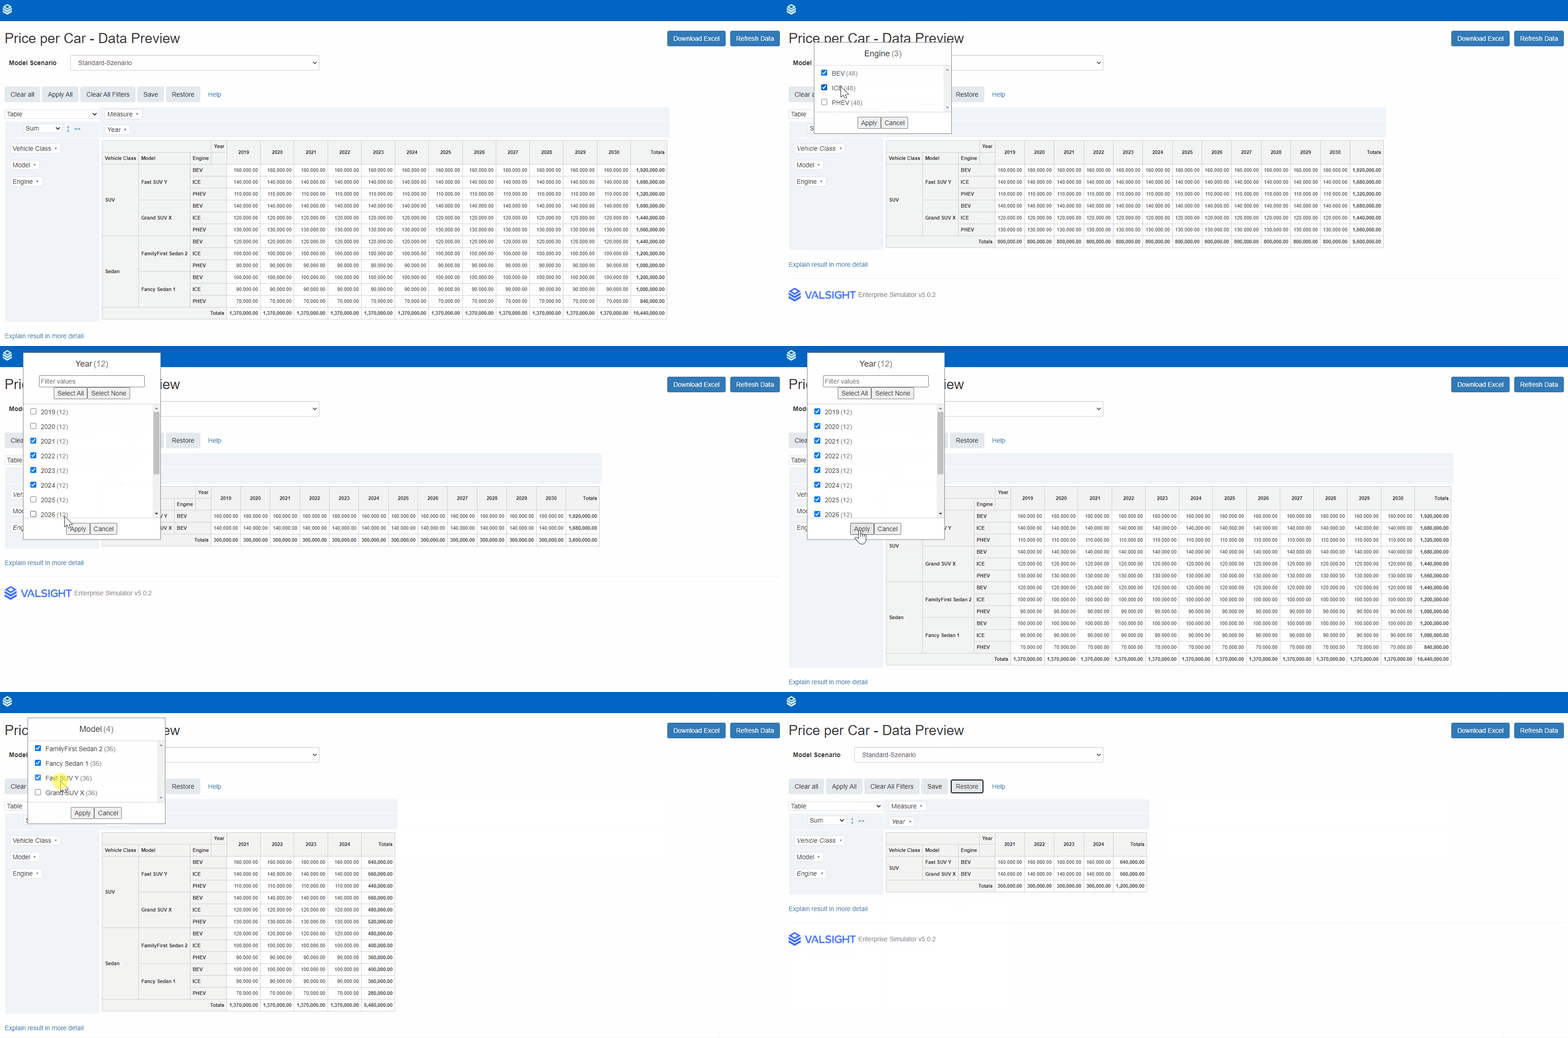
For the ‘Clear’ function, the filters have been set on ‘Years’ (show 2019, 2020) and ‘Engine’ (show BEV).
With ‘Clear’, those filters are reset back to show all available level values.
Save and restore
The ‘Save’ and ‘Restore’ functions work hand in hand.
In the following example, level filters have been set on the vehicle class (show SUV), the Engine (show BEV), and the Year (show 2021 - 2024).
These configurations have been saved.
After continuing to work on the data preview with several filters, the previously saved configurations have been restored via the ‘Restore’ - button.
This restoring can not only be done in the same data preview, but for the data preview of all Nodes of the Project.
The ‘Save’ and ‘Restore’ functions are user bound. That allows user A to save and restore different data configurations than user B.